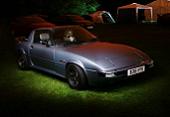
On the left is the oem headlight and on the right is the 'smoked' headlight -
[img]http://i150.photobucket.com/albums/s95/offshore4ft/Headlight%20Guide/DSCN3833_zps74b9b8b2.jpg[/img]
[b]Note: This guide was done using pre-ford koito headlights, the insides of a bosch headlamp are slightly different.[/b]
You will need:-
10mm Socket
Headlights
Oven
Knife/Flat Screwdriver (or similar)
Phillips screwdriver
Masking Tape
Paper
Fine Wet&Dry/Scourer
Primer
Black Paint
Sealant (Optional)
Firstly remove the headlight from the car by the undoing the three 10mm bolts.
Remove the 4 metal clips, breather pipes and bulbs.
[img]http://i150.photobucket.com/albums/s95/offshore4ft/Headlight%20Guide/DSCN1695_zpsffae6975.jpg[/img]
Stick the headlight in an oven on around 150 degrees but keep the door open a bit and you must keep an eye on it as it [u]will[/u] melt.
[img]http://i150.photobucket.com/albums/s95/offshore4ft/Headlight%20Guide/DSCN1699_zpsa45c2d5e.jpg[/img]
Keep tugging on the glass every minute or two to see if the glue has melted. Mine took approx 5 mins and the glass literally fell apart from the unit (some plastic parts had decided to 'droop' though

Oops!). The first headlight i did, i needed to use a knife to remove the glass.
[img]http://i150.photobucket.com/albums/s95/offshore4ft/Headlight%20Guide/DSCN1702_zps8f022644.jpg[/img]
[img]http://i150.photobucket.com/albums/s95/offshore4ft/Headlight%20Guide/DSCN1706_zps2595c954.jpg[/img]
It's up to you which parts you spray inside, some people just spray the projector but i personally feel doing it the way i do it gives a more balanced tint to the lights.
I removed the projector part by undoing the one phillips screw.
The full beam lens can be removed but from personal experience it's best to leave it in place.
Using masking tape i followed the lines of the lens to leave a small smooth line around the outside lip. Using paper and masking tape i covered the rest of the light to prevent paint getting anywhere else.
[img]http://i150.photobucket.com/albums/s95/offshore4ft/Headlight%20Guide/DSCN1707_zps0f92b8e2.jpg[/img]
[img]http://i150.photobucket.com/albums/s95/offshore4ft/Headlight%20Guide/DSCN1708_zps98847cc4.jpg[/img]
[img]http://i150.photobucket.com/albums/s95/offshore4ft/Headlight%20Guide/DSCN1709_zps863864ce.jpg[/img]
Using fine wet & dry or a scourer pad, i lightly keyed the chrome surface to give the primer something to stick too.
[img]http://i150.photobucket.com/albums/s95/offshore4ft/Headlight%20Guide/DSCN1710_zps2313979b.jpg[/img]
Once i'd found some suitable reading material, i began to prime and paint. It's up to you how many coats you do. I found 2x Primer and 2x Black Paint to be sufficient. Some people use high temperature paint. I use gloss black without lacquer. I've had these on my car for 2 months now with HID's installed and they are still perfect inside.
[img]http://i150.photobucket.com/albums/s95/offshore4ft/Headlight%20Guide/DSCN1711_zps5996bfd5.jpg[/img]
[img]http://i150.photobucket.com/albums/s95/offshore4ft/Headlight%20Guide/DSCN1712_zps2fd74464.jpg[/img]
[img]http://i150.photobucket.com/albums/s95/offshore4ft/Headlight%20Guide/DSCN1713_zpse488f44f.jpg[/img]
When the paint is dry, [u]carefully[/u] remove the masking tape. If your not careful you can take off some of the chrome paint from the lens.
[img]http://i150.photobucket.com/albums/s95/offshore4ft/Headlight%20Guide/DSCN1715_zps6e2b1436.jpg[/img]
[img]http://i150.photobucket.com/albums/s95/offshore4ft/Headlight%20Guide/DSCN1714_zps5b167e4a.jpg[/img]
Put it all back together in the opposite way to how you took it off (incl baking in the oven to warm the glue up). I would recommend using sealant when putting the lights back together. I haven't simply because i haven't got any, so far i've found the original glue to be pretty good and i've had no condensation problems.
I hope the guide helps all of the people who asked and others too

Feel free to pm me any questions

Scott

 Login
 Register
 FAQ
 Search


 :evil4::evil4::evil4::evil4::evil4::evil4:
 [/url]